> ## Documentation Index
> Fetch the complete documentation index at: https://docs.helpgenie.ai/llms.txt
> Use this file to discover all available pages before exploring further.
# Account Branding
> Set the default logo, colors, and styling applied to every new Genie you create.
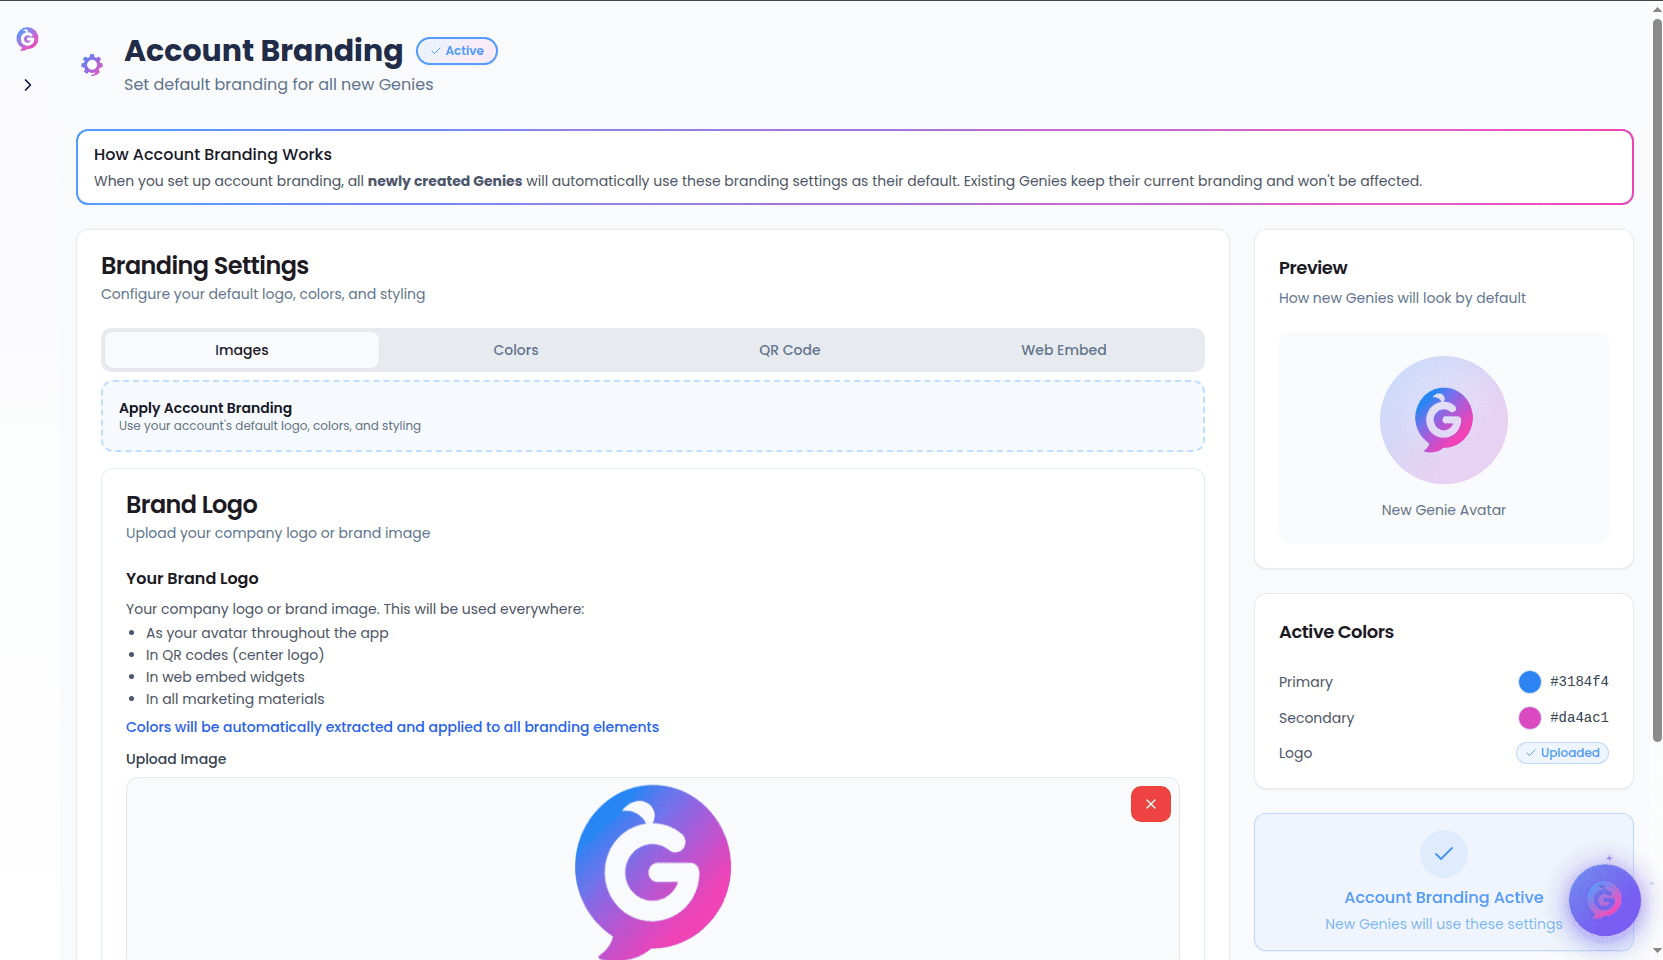
Account Branding lets you define one set of brand defaults — a logo, colors, gradient, and widget styling — that is automatically applied to **every newly created Genie**. Set it once and your Genies stay on-brand without configuring each one by hand.
You'll find it under **Genie Hub → Account Branding** (`/genie-hub/account-branding`).
 Account Branding only affects Genies created **after** you save it. Existing Genies keep their current branding and are never changed. You can always adjust an individual Genie's branding on its own settings page.
## Before you start
Account Branding is tied to your team. If you haven't created a team yet, the page will prompt you to do so first — head to **Account Settings** to create your team, then return here.
When branding is saved, an **Active** badge appears next to the page title and the status panel confirms that new Genies will use your settings.
## The page at a glance
The page is split into two columns:
* **Branding Settings** (left) — the editor where you configure everything, organized into four tabs: **Images**, **Colors**, **QR Code**, and **Web Embed**.
* **Preview** (right) — a live preview of how a new Genie's avatar will look, an **Active Colors** summary, and a status card showing whether Account Branding is currently active.
Changes you make in the editor update the preview instantly, but nothing is saved until you select **Save Branding**.
## Images
### Brand logo
Upload your company logo or brand image. This single image is reused everywhere:
* As your Genie's avatar throughout the app
* In the center of generated QR codes
* In web embed widgets
* In marketing materials
When you upload a logo, its colors are **automatically extracted and applied** across all your branding — primary and secondary colors, QR code, and web embed header — so everything matches your image out of the box. Background removal and square-padding options are available during upload to help your logo sit cleanly inside the round avatar.
### Generate a logo
Don't have a logo ready? Use the built-in **Smart Logo Generator** to create one:
Type the brand or business name for the logo. This is the only required field.
Pick from **Modern** (default), **Bold**, **Friendly**, **Tech**, **Luxury**, or **Classic**.
Optionally add a short **Description** (e.g. "A plumbing business in Austin specializing in residential repairs") and select an **Industry** to sharpen the result.
Select **Generate Logo**. When it's ready, choose **Use This Logo** to apply it — or **Regenerate** to try again. Applying a generated logo also extracts and applies its colors.
## Colors
The Colors tab controls the color scheme used for your Genie avatar, buttons, and highlights across the app.
* **Primary Color** — the main brand color. Sets the avatar, buttons, and accents.
* **Secondary Color** — the second color used when a gradient is enabled.
* **Background Color** — used for the web embed widget background.
* **Text Color** — used for text in the web embed widget.
You can set each color with the color picker or by typing a hex value (e.g. `#4E9CFF`).
If you uploaded a logo, an extracted **color palette** appears at the top — click any swatch to assign it as your primary or secondary color. Select **Reset to Extracted** at any time to snap the colors back to those pulled from your logo.
### Gradient
Turn on **Enable Gradient** to blend your primary and secondary colors on the avatar. When enabled, a **Gradient Angle** slider (0°–360°, default 135°) controls the direction of the blend.
A live avatar preview lets you check the result in **Idle**, **Speaking**, and **Listening** states.
## QR Code
Style the QR codes generated for your Genies:
* **Foreground Color** — the color of the QR code pattern.
* **Background Color** — the color behind the pattern.
Your logo (if uploaded) appears in the center of the code, and a live preview shows the finished result.
## Web Embed
Control the look of the chat widget embedded on your website:
* **Border Radius** — how rounded the widget corners are (0–50).
* **Shadow Effect** — toggle a drop shadow on or off.
* **Font Family** — **System Default**, **Arial**, **Georgia**, **Inter**, or **Roboto**.
* **Button Style** — **Rounded**, **Square**, or **Pill**.
* **Header Color** — an optional color for the widget header. Leave it blank to use your primary color.
## Saving
Select **Save Branding** to store your settings. From that point on, every new Genie you create starts with this logo, colors, gradient, and styling already applied.
When creating or editing an individual Genie, you can also select **Apply Account Branding** to pull these defaults into that Genie at any time.
Account Branding only affects Genies created **after** you save it. Existing Genies keep their current branding and are never changed. You can always adjust an individual Genie's branding on its own settings page.
## Before you start
Account Branding is tied to your team. If you haven't created a team yet, the page will prompt you to do so first — head to **Account Settings** to create your team, then return here.
When branding is saved, an **Active** badge appears next to the page title and the status panel confirms that new Genies will use your settings.
## The page at a glance
The page is split into two columns:
* **Branding Settings** (left) — the editor where you configure everything, organized into four tabs: **Images**, **Colors**, **QR Code**, and **Web Embed**.
* **Preview** (right) — a live preview of how a new Genie's avatar will look, an **Active Colors** summary, and a status card showing whether Account Branding is currently active.
Changes you make in the editor update the preview instantly, but nothing is saved until you select **Save Branding**.
## Images
### Brand logo
Upload your company logo or brand image. This single image is reused everywhere:
* As your Genie's avatar throughout the app
* In the center of generated QR codes
* In web embed widgets
* In marketing materials
When you upload a logo, its colors are **automatically extracted and applied** across all your branding — primary and secondary colors, QR code, and web embed header — so everything matches your image out of the box. Background removal and square-padding options are available during upload to help your logo sit cleanly inside the round avatar.
### Generate a logo
Don't have a logo ready? Use the built-in **Smart Logo Generator** to create one:
Type the brand or business name for the logo. This is the only required field.
Pick from **Modern** (default), **Bold**, **Friendly**, **Tech**, **Luxury**, or **Classic**.
Optionally add a short **Description** (e.g. "A plumbing business in Austin specializing in residential repairs") and select an **Industry** to sharpen the result.
Select **Generate Logo**. When it's ready, choose **Use This Logo** to apply it — or **Regenerate** to try again. Applying a generated logo also extracts and applies its colors.
## Colors
The Colors tab controls the color scheme used for your Genie avatar, buttons, and highlights across the app.
* **Primary Color** — the main brand color. Sets the avatar, buttons, and accents.
* **Secondary Color** — the second color used when a gradient is enabled.
* **Background Color** — used for the web embed widget background.
* **Text Color** — used for text in the web embed widget.
You can set each color with the color picker or by typing a hex value (e.g. `#4E9CFF`).
If you uploaded a logo, an extracted **color palette** appears at the top — click any swatch to assign it as your primary or secondary color. Select **Reset to Extracted** at any time to snap the colors back to those pulled from your logo.
### Gradient
Turn on **Enable Gradient** to blend your primary and secondary colors on the avatar. When enabled, a **Gradient Angle** slider (0°–360°, default 135°) controls the direction of the blend.
A live avatar preview lets you check the result in **Idle**, **Speaking**, and **Listening** states.
## QR Code
Style the QR codes generated for your Genies:
* **Foreground Color** — the color of the QR code pattern.
* **Background Color** — the color behind the pattern.
Your logo (if uploaded) appears in the center of the code, and a live preview shows the finished result.
## Web Embed
Control the look of the chat widget embedded on your website:
* **Border Radius** — how rounded the widget corners are (0–50).
* **Shadow Effect** — toggle a drop shadow on or off.
* **Font Family** — **System Default**, **Arial**, **Georgia**, **Inter**, or **Roboto**.
* **Button Style** — **Rounded**, **Square**, or **Pill**.
* **Header Color** — an optional color for the widget header. Leave it blank to use your primary color.
## Saving
Select **Save Branding** to store your settings. From that point on, every new Genie you create starts with this logo, colors, gradient, and styling already applied.
When creating or editing an individual Genie, you can also select **Apply Account Branding** to pull these defaults into that Genie at any time.