> ## Documentation Index
> Fetch the complete documentation index at: https://docs.helpgenie.ai/llms.txt
> Use this file to discover all available pages before exploring further.
# Account Settings
> Manage your profile, team, security, billing, phone numbers, API keys, and troubleshooting tools from one place.
Account Settings is the hub for everything tied to your account — your personal profile, your team, sign-in security, billing and subscription, purchased calls and phone numbers, developer API keys, and browser troubleshooting tools.
You'll find it under **Genie Hub → Account Settings** (`/genie-hub/account-settings`). The page is organized into five tabs: **Profile**, **Security**, **Billing**, **Developers**, and **Troubleshooting**.
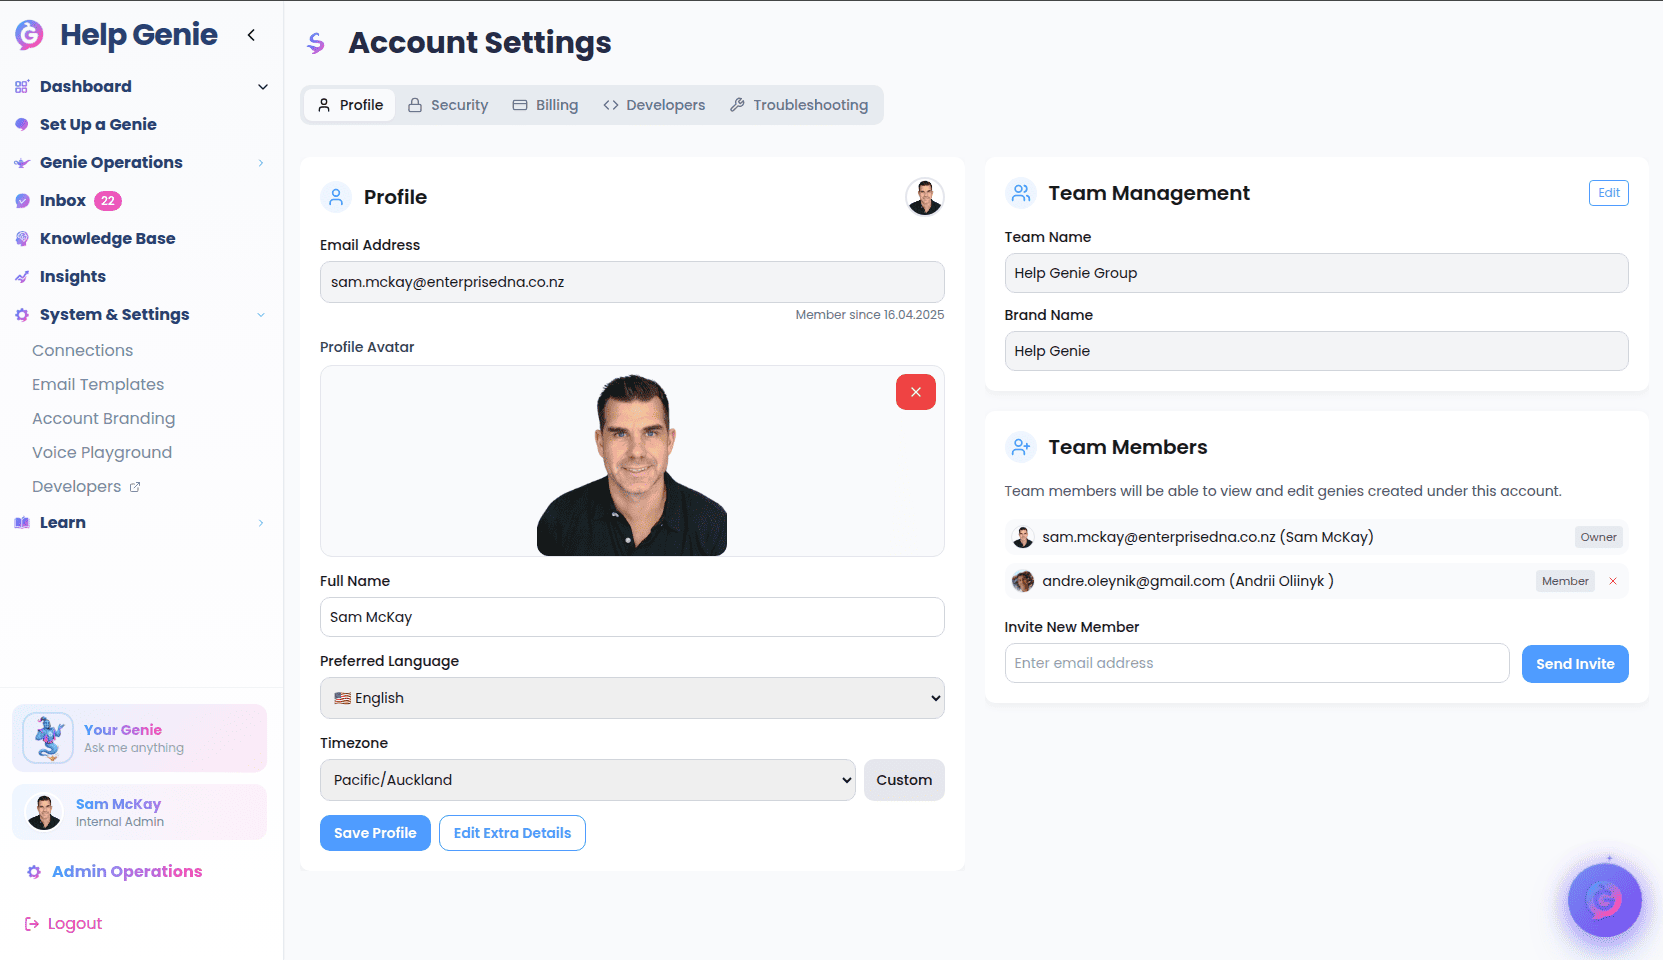 ## Profile
The Profile tab covers your personal details and your team.
### Your profile
The **Profile** card shows your account basics:
* **Email Address** — the email you signed up with. It's shown for reference and can't be changed here. The date you joined appears beneath it as *Member since*.
* **Profile Avatar** — upload an image to use as your personal avatar.
* **Full Name** — your display name.
* **Preferred Language** — pick your language from the list.
* **Timezone** — choose from the list of common timezones, or select **Custom** to type your own (e.g. `UTC+5:30`). Switch back with **Use List**.
Select **Save Profile** to store your avatar, name, language, and timezone.
#### Extra details
Select **Edit Extra Details** to open a side panel with additional optional information: phone number and country code, address, city, state/province, postal code, country, date of birth, company name, and job title. If a billing currency is set on your account, it's shown here for reference and can't be edited. Select **Save Details** to store these, or **Cancel** to discard them.
### Team Management
The **Team Management** card lets you group people under a single account so they can share Genies.
Team members can view and edit every Genie created under the account. Only the team **owner** can change team settings or manage members.
If you don't have a team yet:
* **Business accounts** see a **Create Team** button. Enter a **Team Name** (required) and an optional **Brand Name**, then select **Create Team** — you become the team owner.
* Other account types see a note that team creation is available for business users only.
If you already have a team, its **Team Name** and **Brand Name** are shown. As the owner, select **Edit** to change them and **Save Changes** to apply. Members who aren't the owner see the details read-only.
### Team Members
The **Team Members** card lists everyone on your team along with their role. Pending invitations appear here too, marked **Invited**.
As the team owner you can:
Enter an email address under **Invite New Member** and select **Send Invite**. The person receives an email inviting them to join your team.
Select the **✕** next to a person to remove them from the team, or to cancel a pending invitation. The team owner can't be removed.
## Security
The Security tab handles your sign-in password and gives you access to policy documents.
### Change Password
Enter a **New Password** and **Confirm New Password**, then select **Update Password**. Passwords must be at least 6 characters and the two entries must match. This change takes effect immediately.
### Privacy & Policies
This card links to HelpGenie's policy and compliance documents, which open in a new tab:
* Privacy Statement
* Information Security Policy
* Internal Privacy Policy
* Responsible AI Use Policy
* Security & Infrastructure Overview
* Data Processing Addendum
* Identity & Access Management Policy
* Sub-Processor List
## Billing
The Billing tab shows your subscription, extra call purchases, and active phone numbers.
### Subscription
If you're on the **Free Plan**, this card summarizes what an upgrade unlocks and offers a **View Pricing Plans** link.
On a paid subscription, you'll see:
* **Status** — Active, Trialing, Canceled, or Past Due.
* **Available Genies** — your total Genie allowance, broken down as *1 free + plan Genies + extra Genies*. Select the **+** to purchase more: choose a new quantity and select **Upgrade**.
* **Key dates** — trial end date (if trialing), your next billing date (or end date), and the date your subscription started.
* A **status message** confirming your subscription is in good standing, or prompting you to choose a plan if it isn't.
Two actions sit at the top of the card:
* **Manage Billing** — opens the secure billing portal where you can update payment details, invoices, and plan.
* **Sync Billing Data** — refreshes your subscription details if they look incorrect or out of date. There's a short cooldown between syncs; the button tells you how long to wait if it's temporarily unavailable.
### Call Purchases
Extra calls raise a Genie's **daily call limit** beyond what your plan includes.
You need a payment method on file to buy extra calls. Without one, the **Add** button is disabled. Extra calls are billed every month and renew on your billing cycle date.
The card lists your existing purchases with the Genie, quantity, status, and date. To buy more:
Select **Add**.
Select the Genie the calls apply to. Its current daily call limit is shown.
Enter how many calls to purchase. The panel shows the per-call price, the total cost, and the new daily limit before you confirm.
Select **Purchase**. You're charged using your existing payment method.
To reduce a purchase, select the **–** next to it, enter how many calls to remove (leave it empty or `0` to cancel all of them), and select **Reduce Calls**. Reductions apply on your next billing cycle.
### Active Phone Numbers
This card lists the phone numbers assigned to your Genies, showing the Genie name, the number, and its type.
Select **Release** next to a number to give it up. You'll be asked to confirm first.
Releasing a phone number can't be undone — you won't get the same number back.
If you have any previously released numbers, they appear under a collapsible **Cancelled Phone Numbers** section. New numbers are provisioned from an individual Genie's settings, not here.
## Developers
The Developers tab manages **API keys** used to authenticate requests to the HelpGenie API.
The tab lists your active keys — each showing its name, a masked prefix (`hg_live_…`), when it was created, and when it was last used. Revoked keys appear in a separate **Revoked** list for reference.
### Create an API key
Select **Create API Key**.
Give it a descriptive name (e.g. "Production", "Development") so you can recognize it later, then select **Create API Key**.
Your full key is shown once, along with a usage example. Copy it now and store it somewhere safe.
A key's full value is shown only at creation. You won't be able to see it again — if you lose it, revoke the key and create a new one.
### Revoke an API key
Select **Revoke** next to an active key and confirm. Any requests using that key stop working immediately.
## Troubleshooting
The Troubleshooting tab provides tools to clear locally stored data when the web app is misbehaving.
* **Clear Browser Cache** — clears cached app files stored by your browser. A good first step for display glitches or stale content.
* **Clear App Data** — removes locally cached analysis, conversation, and transcript data, while leaving your sign-in and other settings in place.
* **Clear All Storage** — wipes everything the app has stored locally. Use this as a last resort; you may need to sign in again afterward.
These tools only affect data stored in your current browser. They don't change your account, Genies, or any data saved to your account.
## Profile
The Profile tab covers your personal details and your team.
### Your profile
The **Profile** card shows your account basics:
* **Email Address** — the email you signed up with. It's shown for reference and can't be changed here. The date you joined appears beneath it as *Member since*.
* **Profile Avatar** — upload an image to use as your personal avatar.
* **Full Name** — your display name.
* **Preferred Language** — pick your language from the list.
* **Timezone** — choose from the list of common timezones, or select **Custom** to type your own (e.g. `UTC+5:30`). Switch back with **Use List**.
Select **Save Profile** to store your avatar, name, language, and timezone.
#### Extra details
Select **Edit Extra Details** to open a side panel with additional optional information: phone number and country code, address, city, state/province, postal code, country, date of birth, company name, and job title. If a billing currency is set on your account, it's shown here for reference and can't be edited. Select **Save Details** to store these, or **Cancel** to discard them.
### Team Management
The **Team Management** card lets you group people under a single account so they can share Genies.
Team members can view and edit every Genie created under the account. Only the team **owner** can change team settings or manage members.
If you don't have a team yet:
* **Business accounts** see a **Create Team** button. Enter a **Team Name** (required) and an optional **Brand Name**, then select **Create Team** — you become the team owner.
* Other account types see a note that team creation is available for business users only.
If you already have a team, its **Team Name** and **Brand Name** are shown. As the owner, select **Edit** to change them and **Save Changes** to apply. Members who aren't the owner see the details read-only.
### Team Members
The **Team Members** card lists everyone on your team along with their role. Pending invitations appear here too, marked **Invited**.
As the team owner you can:
Enter an email address under **Invite New Member** and select **Send Invite**. The person receives an email inviting them to join your team.
Select the **✕** next to a person to remove them from the team, or to cancel a pending invitation. The team owner can't be removed.
## Security
The Security tab handles your sign-in password and gives you access to policy documents.
### Change Password
Enter a **New Password** and **Confirm New Password**, then select **Update Password**. Passwords must be at least 6 characters and the two entries must match. This change takes effect immediately.
### Privacy & Policies
This card links to HelpGenie's policy and compliance documents, which open in a new tab:
* Privacy Statement
* Information Security Policy
* Internal Privacy Policy
* Responsible AI Use Policy
* Security & Infrastructure Overview
* Data Processing Addendum
* Identity & Access Management Policy
* Sub-Processor List
## Billing
The Billing tab shows your subscription, extra call purchases, and active phone numbers.
### Subscription
If you're on the **Free Plan**, this card summarizes what an upgrade unlocks and offers a **View Pricing Plans** link.
On a paid subscription, you'll see:
* **Status** — Active, Trialing, Canceled, or Past Due.
* **Available Genies** — your total Genie allowance, broken down as *1 free + plan Genies + extra Genies*. Select the **+** to purchase more: choose a new quantity and select **Upgrade**.
* **Key dates** — trial end date (if trialing), your next billing date (or end date), and the date your subscription started.
* A **status message** confirming your subscription is in good standing, or prompting you to choose a plan if it isn't.
Two actions sit at the top of the card:
* **Manage Billing** — opens the secure billing portal where you can update payment details, invoices, and plan.
* **Sync Billing Data** — refreshes your subscription details if they look incorrect or out of date. There's a short cooldown between syncs; the button tells you how long to wait if it's temporarily unavailable.
### Call Purchases
Extra calls raise a Genie's **daily call limit** beyond what your plan includes.
You need a payment method on file to buy extra calls. Without one, the **Add** button is disabled. Extra calls are billed every month and renew on your billing cycle date.
The card lists your existing purchases with the Genie, quantity, status, and date. To buy more:
Select **Add**.
Select the Genie the calls apply to. Its current daily call limit is shown.
Enter how many calls to purchase. The panel shows the per-call price, the total cost, and the new daily limit before you confirm.
Select **Purchase**. You're charged using your existing payment method.
To reduce a purchase, select the **–** next to it, enter how many calls to remove (leave it empty or `0` to cancel all of them), and select **Reduce Calls**. Reductions apply on your next billing cycle.
### Active Phone Numbers
This card lists the phone numbers assigned to your Genies, showing the Genie name, the number, and its type.
Select **Release** next to a number to give it up. You'll be asked to confirm first.
Releasing a phone number can't be undone — you won't get the same number back.
If you have any previously released numbers, they appear under a collapsible **Cancelled Phone Numbers** section. New numbers are provisioned from an individual Genie's settings, not here.
## Developers
The Developers tab manages **API keys** used to authenticate requests to the HelpGenie API.
The tab lists your active keys — each showing its name, a masked prefix (`hg_live_…`), when it was created, and when it was last used. Revoked keys appear in a separate **Revoked** list for reference.
### Create an API key
Select **Create API Key**.
Give it a descriptive name (e.g. "Production", "Development") so you can recognize it later, then select **Create API Key**.
Your full key is shown once, along with a usage example. Copy it now and store it somewhere safe.
A key's full value is shown only at creation. You won't be able to see it again — if you lose it, revoke the key and create a new one.
### Revoke an API key
Select **Revoke** next to an active key and confirm. Any requests using that key stop working immediately.
## Troubleshooting
The Troubleshooting tab provides tools to clear locally stored data when the web app is misbehaving.
* **Clear Browser Cache** — clears cached app files stored by your browser. A good first step for display glitches or stale content.
* **Clear App Data** — removes locally cached analysis, conversation, and transcript data, while leaving your sign-in and other settings in place.
* **Clear All Storage** — wipes everything the app has stored locally. Use this as a last resort; you may need to sign in again afterward.
These tools only affect data stored in your current browser. They don't change your account, Genies, or any data saved to your account.