> ## Documentation Index
> Fetch the complete documentation index at: https://docs.helpgenie.ai/llms.txt
> Use this file to discover all available pages before exploring further.
# Email Templates
> Customize the colors, fonts, sections and branding of the report emails your Genies send, and preview them live before saving.
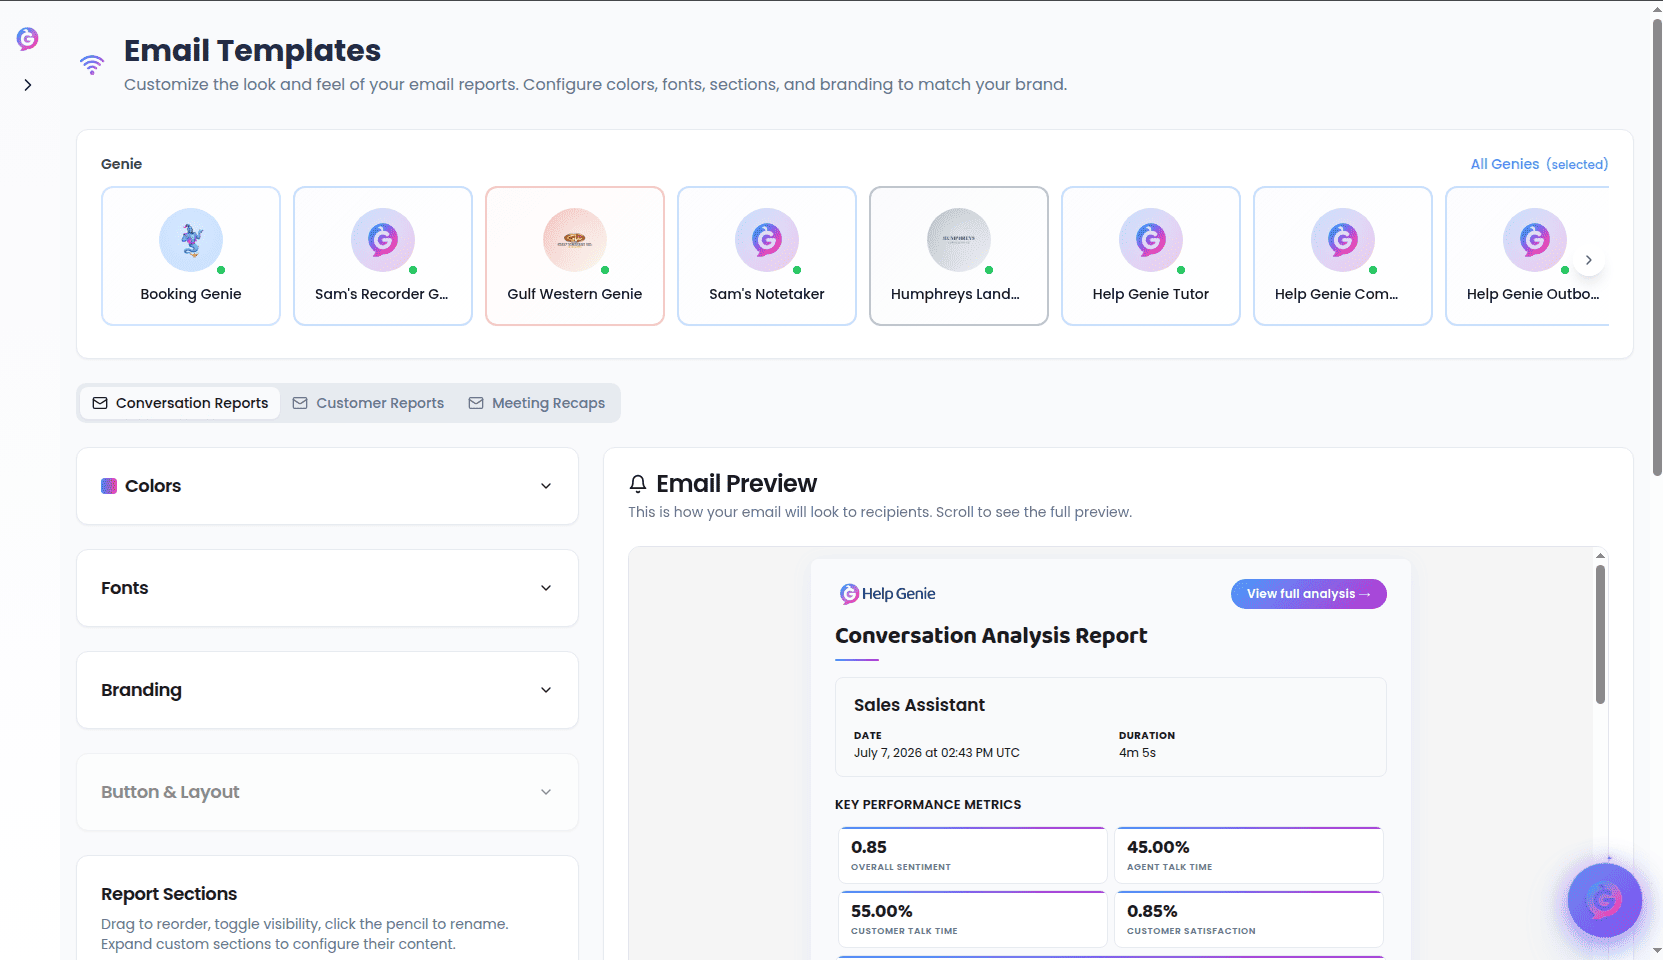
Email Templates lets you control how the report emails your Genies send actually look — the colors, fonts, logo, branding, and which sections appear. Every change shows up instantly in a live preview, so you can match the emails to your brand before anything goes out.
You'll find it under **Genie Hub → Email Templates** (`/genie-hub/email-templates`).
 ## The three report types
At the top of the page, a set of tabs lets you style each kind of report email separately:
* **Conversation Reports** — the analysis email sent after a conversation, with metrics, topics, insights, and the transcript.
* **Customer Reports** — the recap email sent to a customer, with key takeaways, highlights, and useful links.
* **Meeting Recaps** — the follow-up email after a meeting, with attendees, decisions, and an action plan.
Switching tabs loads that report's saved configuration. Each report type keeps its own colors, fonts, sections, and branding.
## Choosing which Genie a template applies to
Just below the header is a **Genie** selector. It controls whose template you're editing:
* **All Genies** (the default) — edits the template used by every Genie that doesn't have its own customization.
* **A specific Genie** — pick a Genie to give it a template of its own, overriding the shared one.
When a specific Genie is selected, the panel can pull in that Genie's own brand colors and logo as suggestions, and the **Button & Layout** options unlock if that Genie has a follow-up link configured.
## The editing layout
The page is split into two columns:
* **On the left**, a stack of collapsible settings sections (Colors, Fonts, Branding, Button & Layout, Report Sections) plus the action buttons.
* **On the right**, a live **Email Preview** showing exactly how the email will look to recipients. It updates as you make changes — scroll inside it to see the full email.
Click any section heading to expand or collapse it.
## Colors
The Colors section controls the palette of the email:
| Color | What it affects |
| ----------------------------------- | -------------------------------------------------------------------------- |
| **Primary Color** | The main brand color used for headers and highlights. |
| **Accent Color** | A secondary color for accents and emphasis. |
| **Text Color** | The body text color. |
| **Background Color** | The email's background. |
| **Header Color** *(optional)* | Overrides the header color; falls back to the primary color if left empty. |
| **Section Background** *(optional)* | A light tint behind sections; falls back to a default if left empty. |
For each color you can use the color picker or type a hex value (for example `#4E9CFF`).
If you've selected a specific Genie that already has brand colors, a **Colors from \[Genie]** panel appears at the top of this section with its brand swatches. Click any swatch to apply it as your Primary color.
A couple of helpers keep your emails readable:
* **Contrast protection** — if your text color would be hard to read against the background, it's automatically nudged to keep it legible, and a **⚠ Low contrast** warning appears when needed.
* **Generate a tint** — next to Section Background, the **Primary** and **Accent** buttons generate a soft, light version of that color to use as the section tint.
## Fonts
The Fonts section sets the typeface and heading size:
* **Font** — choose from a curated list of web fonts (Poppins is the default).
* **Heading Size** — the size of headings in pixels, from **16** to **64** (default **32**).
## Branding
The Branding section handles your logo and identity:
* **Apply branding in one click** — when a Genie (or, for **All Genies**, your team) has branding set up, a preview card shows its logo and colors with an **Apply** button that copies those into the template. If there's no branding configured, the card says so.
* **Logo** — shows the current logo. Use **Change Logo** to upload an image or paste a direct image URL (PNG, JPG, or SVG). If you've set a custom logo, **Reset to Default** restores the standard Help Genie logo.
* **Company Name** — the name shown in the email.
* **Applied Colors** — a read-only summary of the current Primary, Accent, Text, and Background colors. Edit these in the Colors section above.
## Button & Layout
These options control the shape and styling of visual elements in the email:
* **Border Radius** — corner rounding for cards, sections, and containers, from **0** to **24** px (default **8**).
* **Button Style** — **Rounded**, **Square**, or **Pill** for the call-to-action button.
* **Enable Shadow** — adds a soft shadow around the main container.
* **Button Text** — the label on the call-to-action button (default *View Full Report*).
Button & Layout options only apply when the selected Genie has a follow-up link (redirect URL) configured. If it doesn't, this section is greyed out with a reminder.
## Report Sections
The **Report Sections** editor controls which blocks appear in the email and in what order. Each report type comes with its own built-in blocks — for example a Conversation Report includes metrics, topics, insights, and the transcript.
For every section you can:
* **Reorder** — drag the grip handle to move a section up or down.
* **Show or hide** — use the toggle on the right.
* **Rename** — click the pencil to give a section a custom label (the original name stays visible in brackets for reference).
Built-in sections can be reordered, renamed, and hidden, but not deleted.
### Adding your own sections
Use **Add Section** to insert custom blocks. You can add up to **10** custom sections:
* **Text Section** — a custom heading and body text, with left/center/right alignment.
* **Call to Action** — a clickable button with your own text and URL.
* **Divider** — a horizontal line separator.
* **Image** — an image from an upload or URL, with alt text, a max width, and alignment.
Expand a custom section (the chevron) to edit its content, and use the trash icon to remove it. Once you reach the limit, the Add Section button shows **(max 10)** and is disabled.
## Saving and resetting
At the bottom of the settings column:
* **Save Configuration** — saves the current template for the selected Genie (or for All Genies).
* **Clone from Default** — starts from a fresh copy of the standard template for this report type. If a specific Genie is selected, its branding is applied to the copy automatically. You'll be asked to confirm first.
* **Reset to Defaults** — reverts the settings on screen back to the built-in defaults.
Changes aren't applied to outgoing emails until you select **Save Configuration**. Clone and Reset only change what's shown in the editor and preview.
## The three report types
At the top of the page, a set of tabs lets you style each kind of report email separately:
* **Conversation Reports** — the analysis email sent after a conversation, with metrics, topics, insights, and the transcript.
* **Customer Reports** — the recap email sent to a customer, with key takeaways, highlights, and useful links.
* **Meeting Recaps** — the follow-up email after a meeting, with attendees, decisions, and an action plan.
Switching tabs loads that report's saved configuration. Each report type keeps its own colors, fonts, sections, and branding.
## Choosing which Genie a template applies to
Just below the header is a **Genie** selector. It controls whose template you're editing:
* **All Genies** (the default) — edits the template used by every Genie that doesn't have its own customization.
* **A specific Genie** — pick a Genie to give it a template of its own, overriding the shared one.
When a specific Genie is selected, the panel can pull in that Genie's own brand colors and logo as suggestions, and the **Button & Layout** options unlock if that Genie has a follow-up link configured.
## The editing layout
The page is split into two columns:
* **On the left**, a stack of collapsible settings sections (Colors, Fonts, Branding, Button & Layout, Report Sections) plus the action buttons.
* **On the right**, a live **Email Preview** showing exactly how the email will look to recipients. It updates as you make changes — scroll inside it to see the full email.
Click any section heading to expand or collapse it.
## Colors
The Colors section controls the palette of the email:
| Color | What it affects |
| ----------------------------------- | -------------------------------------------------------------------------- |
| **Primary Color** | The main brand color used for headers and highlights. |
| **Accent Color** | A secondary color for accents and emphasis. |
| **Text Color** | The body text color. |
| **Background Color** | The email's background. |
| **Header Color** *(optional)* | Overrides the header color; falls back to the primary color if left empty. |
| **Section Background** *(optional)* | A light tint behind sections; falls back to a default if left empty. |
For each color you can use the color picker or type a hex value (for example `#4E9CFF`).
If you've selected a specific Genie that already has brand colors, a **Colors from \[Genie]** panel appears at the top of this section with its brand swatches. Click any swatch to apply it as your Primary color.
A couple of helpers keep your emails readable:
* **Contrast protection** — if your text color would be hard to read against the background, it's automatically nudged to keep it legible, and a **⚠ Low contrast** warning appears when needed.
* **Generate a tint** — next to Section Background, the **Primary** and **Accent** buttons generate a soft, light version of that color to use as the section tint.
## Fonts
The Fonts section sets the typeface and heading size:
* **Font** — choose from a curated list of web fonts (Poppins is the default).
* **Heading Size** — the size of headings in pixels, from **16** to **64** (default **32**).
## Branding
The Branding section handles your logo and identity:
* **Apply branding in one click** — when a Genie (or, for **All Genies**, your team) has branding set up, a preview card shows its logo and colors with an **Apply** button that copies those into the template. If there's no branding configured, the card says so.
* **Logo** — shows the current logo. Use **Change Logo** to upload an image or paste a direct image URL (PNG, JPG, or SVG). If you've set a custom logo, **Reset to Default** restores the standard Help Genie logo.
* **Company Name** — the name shown in the email.
* **Applied Colors** — a read-only summary of the current Primary, Accent, Text, and Background colors. Edit these in the Colors section above.
## Button & Layout
These options control the shape and styling of visual elements in the email:
* **Border Radius** — corner rounding for cards, sections, and containers, from **0** to **24** px (default **8**).
* **Button Style** — **Rounded**, **Square**, or **Pill** for the call-to-action button.
* **Enable Shadow** — adds a soft shadow around the main container.
* **Button Text** — the label on the call-to-action button (default *View Full Report*).
Button & Layout options only apply when the selected Genie has a follow-up link (redirect URL) configured. If it doesn't, this section is greyed out with a reminder.
## Report Sections
The **Report Sections** editor controls which blocks appear in the email and in what order. Each report type comes with its own built-in blocks — for example a Conversation Report includes metrics, topics, insights, and the transcript.
For every section you can:
* **Reorder** — drag the grip handle to move a section up or down.
* **Show or hide** — use the toggle on the right.
* **Rename** — click the pencil to give a section a custom label (the original name stays visible in brackets for reference).
Built-in sections can be reordered, renamed, and hidden, but not deleted.
### Adding your own sections
Use **Add Section** to insert custom blocks. You can add up to **10** custom sections:
* **Text Section** — a custom heading and body text, with left/center/right alignment.
* **Call to Action** — a clickable button with your own text and URL.
* **Divider** — a horizontal line separator.
* **Image** — an image from an upload or URL, with alt text, a max width, and alignment.
Expand a custom section (the chevron) to edit its content, and use the trash icon to remove it. Once you reach the limit, the Add Section button shows **(max 10)** and is disabled.
## Saving and resetting
At the bottom of the settings column:
* **Save Configuration** — saves the current template for the selected Genie (or for All Genies).
* **Clone from Default** — starts from a fresh copy of the standard template for this report type. If a specific Genie is selected, its branding is applied to the copy automatically. You'll be asked to confirm first.
* **Reset to Defaults** — reverts the settings on screen back to the built-in defaults.
Changes aren't applied to outgoing emails until you select **Save Configuration**. Clone and Reset only change what's shown in the editor and preview.