> ## Documentation Index
> Fetch the complete documentation index at: https://docs.helpgenie.ai/llms.txt
> Use this file to discover all available pages before exploring further.
# Portals
> Create custom pages that showcase multiple genies together — group your genies, brand the page, and share it with a single link.
Portals are custom pages that bring several genies together in one place. Use one to showcase your support team, a set of product assistants, or any collection of genies you want visitors to reach from a single link.
You'll find Portals under **Genie Hub → Portals** (`/genie-hub/portals`). The list page is where you create, search, reorder, and remove portals; selecting **Edit Portal** opens a portal's own page where you configure its genies, branding, and settings.
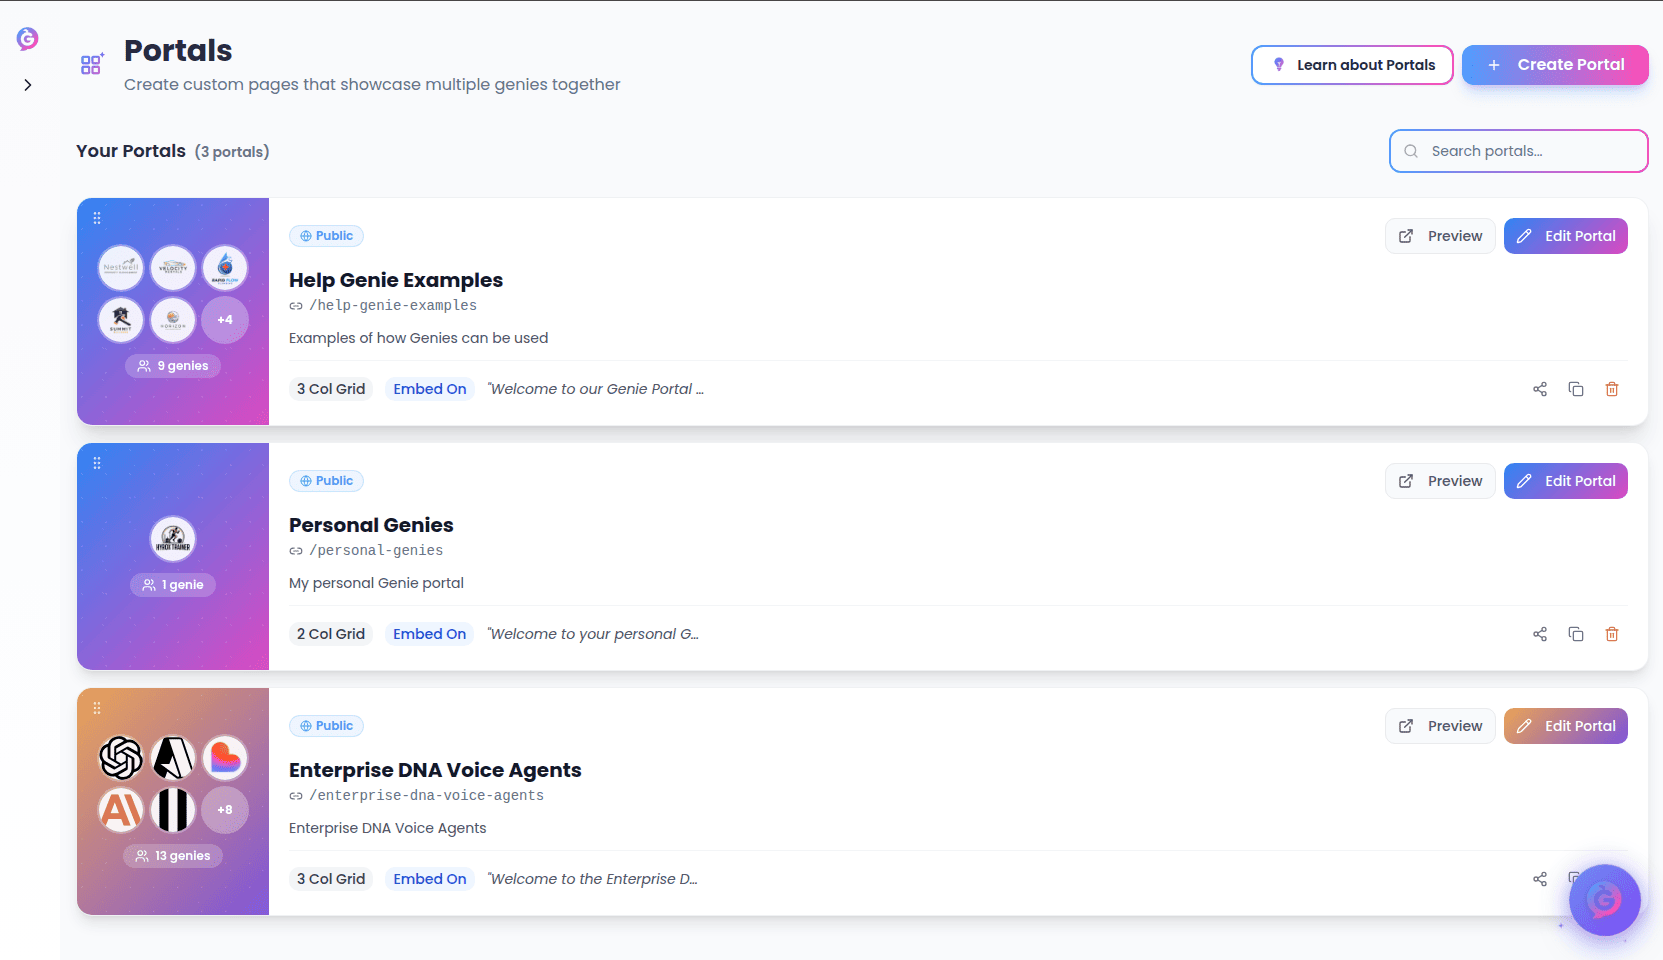 ## The list page
Across the top you'll see:
* A **Portals** heading with a short subtitle.
* **Learn more** — a quick link to guidance for this area.
* **Create Portal** — starts a new portal (see [Creating a portal](#creating-a-portal)).
Below the heading, a **Your Portals** count shows how many portals you have, alongside a **Search portals…** box. Your portals then appear as a stack of cards.
If you have no portals yet, an empty state explains what portals are and offers **Create Your First Portal**.
### Searching
Type in the **Search portals…** box to filter the list as you go. Search matches a portal's name, description, and URL slug. If nothing matches, you'll see a "No portals found" message with a **Clear search** button to reset.
### What each portal card shows
Each card has a branded panel on the left and details on the right:
* The panel previews up to five of the portal's genie avatars (with a **+N** chip when there are more), plus a chip showing the total **genie count**. If the portal has no genies yet, it shows the portal's logo or its first initial instead.
* **Status badges** — **Public** (public and active), **Inactive**, or **Private**, plus a **Protected** badge when the portal is password protected.
* The portal's **name** and its **/slug**.
* The **description**, when one is set.
* Quick facts along the bottom: the grid column count (for example, **3 Col Grid**), an **Embed On** tag when embedding is allowed, and the welcome message, when set.
Card actions:
* **Preview** — opens the live portal in a new tab.
* **Edit Portal** — opens the portal's own page.
* **Copy link** and **Copy embed code** icons — copy the portal's share link or embed snippet to your clipboard.
* **Delete** (trash icon) — removes the portal (see [Deleting a portal](#deleting-a-portal)).
### Reordering
Drag any card by its grip handle (top-left of the branded panel) to change the order your portals appear in. The new order is saved automatically.
Reordering is turned off while a search term is active — clear the search to drag portals again.
### Deleting a portal
Selecting the trash icon opens a confirmation dialog. Deleting a portal can't be undone, but **the genies inside it are not deleted** — only the portal page is removed. Confirm with **Delete** or back out with **Cancel**.
## Creating a portal
**Create Portal** opens a side panel where you set up the basics:
* **Portal Name** (required) — shown at the top of your portal page.
* **Description** — a short summary of what the portal offers.
* **Welcome Message** — greeting shown to visitors when they land on the portal.
* **Branding** (optional, collapsible) — by default a new portal uses your account branding. You can turn that off to set a custom **Primary Color**, **Secondary Color**, and **Enable Gradient** just for this portal. More branding options are available after the portal is created.
Select **Create Portal** to finish. You'll be taken straight to the new portal's page so you can add genies.
Account branding is only available once you've set up brand colors and a logo in **Account Settings**. Until then, the account-branding option is unavailable and new portals use default colors.
## Editing a portal
A portal's own page (`/genie-hub/portals/:portalId`) is where you manage everything about it. Use **Back to Portals** to return to the list.
At the top you'll see the portal's name, its **/portal/slug**, and badges for **Active/Inactive** and **Public** status, plus three quick actions:
* **Preview Portal** — opens the live portal in a new tab.
* **Copy Link** — copies the portal's public link.
* **Save Changes** — saves edits made in any of the sections below.
Changes you make in the sections below are applied when you select **Save Changes**.
### Portal details
Configure the portal's **Name**, **URL Slug**, **Description**, and **Welcome Message**. The slug is the last part of the portal's web address (`/portal/your-slug`); it's automatically tidied into lowercase words separated by hyphens.
### Layout & visibility
* **Grid Columns** — how many columns of genies the portal shows: **2**, **3**, or **4**.
* **Active** — when on, the portal is accessible to visitors; turn it off to take it offline.
* **Public** — when on, anyone with the link can view the portal.
### Branding
Choose how the portal looks:
* **Use Account Branding** — inherit the colors and logo from your account settings. When this is on, a preview shows the account colors and logo that will be used.
* Turn it off to set **custom branding** for this portal only, using the branding editor. A **Reset to Account** button restores the account colors at any time.
When account branding hasn't been set up yet, this section links you to **Account Settings** to configure your brand colors and logo once and reuse them across all portals.
At a glance (outside edit mode), this section shows whether the portal uses **Account Branding** or **Custom Branding**, its colors (solid or gradient), and its logo.
### Genies
This is where you choose which genies appear on the portal.
* **In This Portal** lists the genies already added, with a count. Drag any genie by its grip handle to reorder how they appear on the portal, or use the trash icon to remove one. A **Featured** badge marks any genie set as featured.
* **Available Genies** shows the rest of your genies as a grid of avatars. Use the **Search genies…** box to narrow it down, then select a genie to add it to the portal. Genies already in the portal don't appear here; once every genie has been added, a note tells you so.
Removing a genie only takes it off this portal — the genie itself is not deleted and stays available in My Genies.
### Share & embed
* **Portal Link** — your portal's public address, with a button to copy it.
* **Embed Code** — **Copy Embed Code** copies a snippet you can paste into your own website to embed the portal.
## If a portal can't be found
If you open a portal link that doesn't exist or that you don't have access to, you'll see a **Portal Not Found** message with a **Back to Portals** button to return to the list.
## The list page
Across the top you'll see:
* A **Portals** heading with a short subtitle.
* **Learn more** — a quick link to guidance for this area.
* **Create Portal** — starts a new portal (see [Creating a portal](#creating-a-portal)).
Below the heading, a **Your Portals** count shows how many portals you have, alongside a **Search portals…** box. Your portals then appear as a stack of cards.
If you have no portals yet, an empty state explains what portals are and offers **Create Your First Portal**.
### Searching
Type in the **Search portals…** box to filter the list as you go. Search matches a portal's name, description, and URL slug. If nothing matches, you'll see a "No portals found" message with a **Clear search** button to reset.
### What each portal card shows
Each card has a branded panel on the left and details on the right:
* The panel previews up to five of the portal's genie avatars (with a **+N** chip when there are more), plus a chip showing the total **genie count**. If the portal has no genies yet, it shows the portal's logo or its first initial instead.
* **Status badges** — **Public** (public and active), **Inactive**, or **Private**, plus a **Protected** badge when the portal is password protected.
* The portal's **name** and its **/slug**.
* The **description**, when one is set.
* Quick facts along the bottom: the grid column count (for example, **3 Col Grid**), an **Embed On** tag when embedding is allowed, and the welcome message, when set.
Card actions:
* **Preview** — opens the live portal in a new tab.
* **Edit Portal** — opens the portal's own page.
* **Copy link** and **Copy embed code** icons — copy the portal's share link or embed snippet to your clipboard.
* **Delete** (trash icon) — removes the portal (see [Deleting a portal](#deleting-a-portal)).
### Reordering
Drag any card by its grip handle (top-left of the branded panel) to change the order your portals appear in. The new order is saved automatically.
Reordering is turned off while a search term is active — clear the search to drag portals again.
### Deleting a portal
Selecting the trash icon opens a confirmation dialog. Deleting a portal can't be undone, but **the genies inside it are not deleted** — only the portal page is removed. Confirm with **Delete** or back out with **Cancel**.
## Creating a portal
**Create Portal** opens a side panel where you set up the basics:
* **Portal Name** (required) — shown at the top of your portal page.
* **Description** — a short summary of what the portal offers.
* **Welcome Message** — greeting shown to visitors when they land on the portal.
* **Branding** (optional, collapsible) — by default a new portal uses your account branding. You can turn that off to set a custom **Primary Color**, **Secondary Color**, and **Enable Gradient** just for this portal. More branding options are available after the portal is created.
Select **Create Portal** to finish. You'll be taken straight to the new portal's page so you can add genies.
Account branding is only available once you've set up brand colors and a logo in **Account Settings**. Until then, the account-branding option is unavailable and new portals use default colors.
## Editing a portal
A portal's own page (`/genie-hub/portals/:portalId`) is where you manage everything about it. Use **Back to Portals** to return to the list.
At the top you'll see the portal's name, its **/portal/slug**, and badges for **Active/Inactive** and **Public** status, plus three quick actions:
* **Preview Portal** — opens the live portal in a new tab.
* **Copy Link** — copies the portal's public link.
* **Save Changes** — saves edits made in any of the sections below.
Changes you make in the sections below are applied when you select **Save Changes**.
### Portal details
Configure the portal's **Name**, **URL Slug**, **Description**, and **Welcome Message**. The slug is the last part of the portal's web address (`/portal/your-slug`); it's automatically tidied into lowercase words separated by hyphens.
### Layout & visibility
* **Grid Columns** — how many columns of genies the portal shows: **2**, **3**, or **4**.
* **Active** — when on, the portal is accessible to visitors; turn it off to take it offline.
* **Public** — when on, anyone with the link can view the portal.
### Branding
Choose how the portal looks:
* **Use Account Branding** — inherit the colors and logo from your account settings. When this is on, a preview shows the account colors and logo that will be used.
* Turn it off to set **custom branding** for this portal only, using the branding editor. A **Reset to Account** button restores the account colors at any time.
When account branding hasn't been set up yet, this section links you to **Account Settings** to configure your brand colors and logo once and reuse them across all portals.
At a glance (outside edit mode), this section shows whether the portal uses **Account Branding** or **Custom Branding**, its colors (solid or gradient), and its logo.
### Genies
This is where you choose which genies appear on the portal.
* **In This Portal** lists the genies already added, with a count. Drag any genie by its grip handle to reorder how they appear on the portal, or use the trash icon to remove one. A **Featured** badge marks any genie set as featured.
* **Available Genies** shows the rest of your genies as a grid of avatars. Use the **Search genies…** box to narrow it down, then select a genie to add it to the portal. Genies already in the portal don't appear here; once every genie has been added, a note tells you so.
Removing a genie only takes it off this portal — the genie itself is not deleted and stays available in My Genies.
### Share & embed
* **Portal Link** — your portal's public address, with a button to copy it.
* **Embed Code** — **Copy Embed Code** copies a snippet you can paste into your own website to embed the portal.
## If a portal can't be found
If you open a portal link that doesn't exist or that you don't have access to, you'll see a **Portal Not Found** message with a **Back to Portals** button to return to the list.